|
S ö r e n H e s e - P h o t o g r a p h y
|
|
- Into the Night for Star Trailing - Versioning:
I
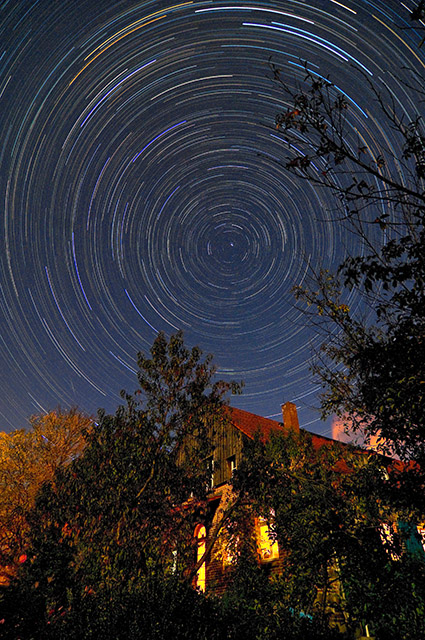
Shooting star trails seemed to be the last arena for analogue SLR cameras and to some degree this is still the case. There are however some techniques that make star trails with digital cameras a wonderful new challenge for night time photography. When you come back from a day full of shooting and the land falls into darkness photography is just not over, empty your CF cards, recharge batteries and you are set for some relaxing hours out there in the cold night. And that is exactly the most important part of the story: being prepared. For a clean star trail with a digital camera there are a couple of things that should be prepared. Ill give a list from my experiences, you might discover that you need other stuff if you start practicing. Creating star trails with digital cameras boils down to stacking tens to hundreds of 1-4 minute exposures. The final exposure is corrected for hot pixels with a dark current reference shot. This dark current exposure is done with the lens cap on using the exact exposure time of the single trail exposures. The final star trail is stacked together with specific software. A good freeware solution is "Startrails" created by Achim Schaller (www.startrails.de). "Startrails" also uses a dark reference shot to correct for hot pixels and can also reduce noise with median filtering multiple foreground pictures together. For planning and orientation a star tracker program is handy. "StarCal" can do this for you. The advantage: you can precisely plan and calculate how and when exactly the rising moon will effect your final image. There are always surprises especially if you leave your set up out there to capture images until the battery dies or the card is full while sleeping in your cosy bed. Usually you will discover airplane "trails and light trails from "falling stars" in your composition. These are more or less unpredictable effects. Star trail photography is like fishing - its hard to predict what exactly enters your photograph. Usually clouds can be a problem messing up your trails and covering the stars. The moon: the appearance of the moon is a serious problem for your star trails because the moon is an enormous light source and you will have to change your exposure times if you want appropriate contrast in your star trail shots. On the other hand the moon can be used very creatively to introduce dramatic effects. Especially together with moving clouds the moonlight can create nice additional cloud trail like features that can make up appealing star trail compositions (this only works if clouds cover only part of your composition). Clouds without moonlight usually are a problem because in your final star trail composite image the clouds create gaps in your trail that do not look very nice (compare with Fig.1).
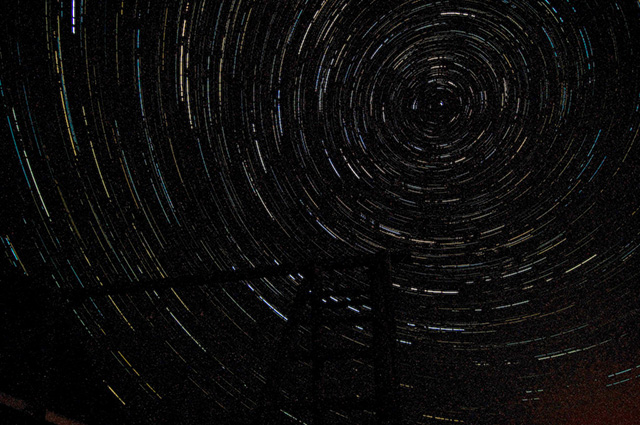
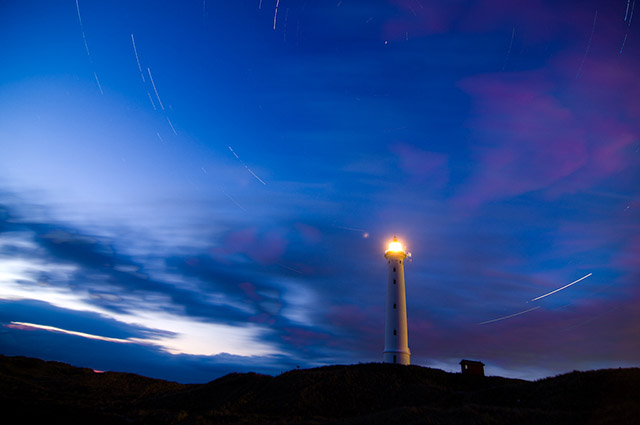
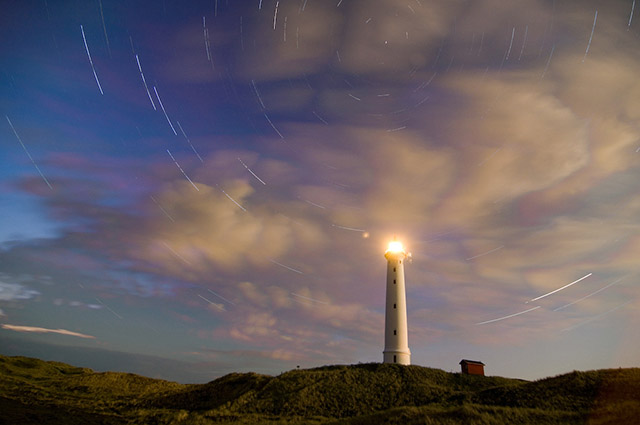
Fig. 1: Incomplete star trails caused by moving cloud coverage. No moonlight. (Tokina 12-24 mm @12 mm f4, iso100, Nikon D2x, exposure: 240 sec. Comparing moonlight exposures with moving cloud coverage with the scenario in Figure 1 its obvious that moonlight renders moving clouds nicely (Fig. 2) but the light covers most of your trails.
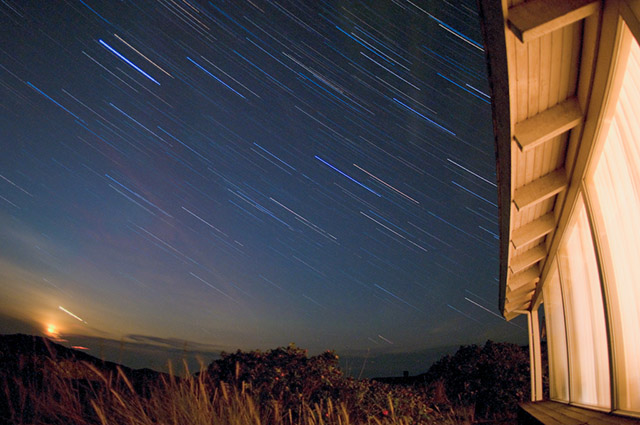
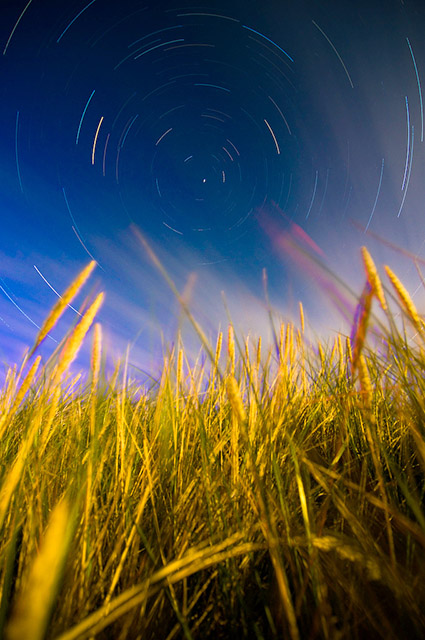
Figure 2 a and b: Star trail examples with moonlight illumination (2.b ) and using a frame without moonlight as background. Both shots are from the same star trail sequence. The example shows how with a specific selection of shots from a star trail series the style can be modified (Nikon D2x, Tokina 12-24 ATX, @12mm f4, 30x180 sec exposures). Usually when you plan to shoot star trails you will try to pre visualize the final star trail image already during the evening when there is enough light to see potential background and foreground objects. I select some positions and make tests in the night with just one 2-4 minute exposure using lenses between 16 mm and 50 mm. 4 Minutes are just right to check a couple of things: is the foreground looking nice, is it in focus, are the star trails in focus, where is Polaris in the composition, do I need more depth of field - where will the moon come up if he comes ... etc.. A good star trail image needs a foreground or some landscape elements that scale the star trail to its dimension in space (f.e. in Figure 3). The star trail alone is (although graphical interesting) not as impressive as shots that put the trail into a context. Usually the context is poorly illuminated but you always have the choice to use flashes to lighten up the foreground but the moon can also do that for you.
Figure 3: 1.5 hour exposure with a fisheye lens using Velvia film (Nikkor 16 mm f2.8, Nikon FM3A). The room in the house was lit with candles. This shot is where the FM3A shines. You can leave the cam outside in the cold for hours and it will nicely keep the shutter open without battery drain - just use a mechanical cable release - that's just how it used to be. In fact the trails look better than with digital cameras IMHO. They do not have these tiny gaps as digital stacked trails often have. On the other hand exposure of foreground objects and overall exposure of the sky is much more difficult to control here. But you can stack various exposures here as well, after scanning the slides. Anyways, I don't do analogue trails anymore. The pre-visualisation with digital is just too important and useful.
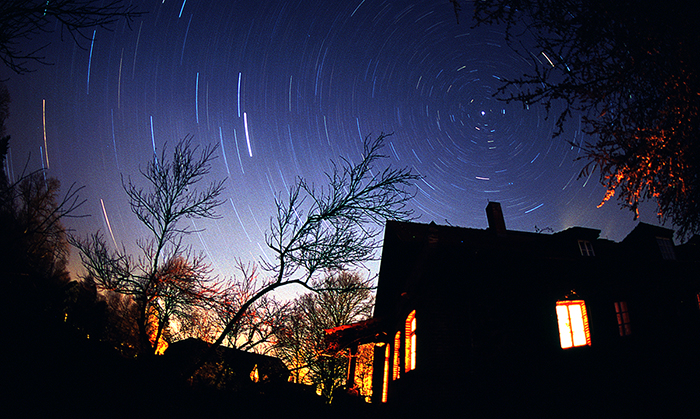
Figure 4: Star trails with the moon disappearing behind clouds. As has been said before equipment plays a vital role with star trails. Here is what I use: 1. first: a sturdy, heavy tripod, better two tripods. Usually the midrange lines from Bogen (Manfrotto) or Gitzo should be your choice. Ball head and clamping system Arca style or hexa-plates. I am using a Gitzo 1325 and a Manfrotto MiniPro with ArcaSwiss Ball head and clamping setup from RRS (Really Right Stuff). 2. a digital DSLR camera that can be controlled with a remote cord timer (f.e. for Nikon: D1x, D200, D2x, D2h and above). You need a 10-pin controller interface on your camera for the remote control timer plug. And the camera should have a solid battery support to allow 2-4 hours of added exposures. In fact you'll create about 20-150 exposures of 1-4 minutes and this runs down every battery easily. I am using a D2x with EN-EL4a support but as an additional setup the D1x is also used. 3. the cable trigger with timer function. For Nikon users the MC-36 is the timer you'll want. Unfortunately this Nikon item is expensive. There are aftermarket versions of this timer that work and look exactly like the MC-36 and cost only half of it. The advantage of this timer: you can set the exposure time to more than 30 seconds if you want. If 30 s are ok, than you are set with the interval function of most digital cameras that support this feature. For most situations the MC-36 is the more flexible solution imo. 4. a hiking compass that gives the north orientation. This is handy if you are new to the stars and the star constellations at your latitude. Its important to know where the North star (Polaris) is, as this star sits more or less on the rotation axis of the Earth. Therefore having Polaris in your composition will create nice circular star trails. To pre-visualize the final composition the position of Polaris is important (btw: if you happen to be located on the southern half of the planet you will hardly find the centre of your circular trails: the southern direction of the view towards the Earth rotation axis lacks a Polaris-equivalent and Polaris itself will be behind the northern horizon. 5. Duck tape. You will need to fix some of your lenses with tape, and its also easier to have the remote trigger fixed to your tripod with tape. Usually in the dark its not easy to position the lens exactly on infinite therefore the best is to focus to infinite with daylight in the evening and to fix the position of the lens with some tape. Older style lenses as the Nikon AIS manual focus lenses make this an easy job because these lenses do not focus past the infinite position. If you use a zoom lens you will also want to fix the zoom ring of the lens. Some zoom lenses tend to creep, especially if the lens slowly gets colder sitting out there in the cold. Btw: tighten your tripod and Ballhead connections as much as possible. Thermal changes tend to change your tripod setup slowly. 6. LED light. If you have no moon light being out in the night it can be very very dark. You will need some light to set up everything correctly. I usually use a small single blue LED light that is f.e. included with some bicycle locker keys from Kryptonite. But everything else will do the job. 7. Lenses: well that's up to your taste and vision but you will need lenses with an opening ration of f2.8 or better. Usually wide angle lenses such as 20 mm and wider create the most impressive star trails compositions. Note that the same trail shot with lets say a 12 mm wide angle lens setting creates shorter trails than the same shot with a 50 mm lens. So in consequence you would want to leave your fisheye out there to create your trails for a longer period than you would with a normal 50 mm lens. If you shoot at moonlight lenses with an opening ratio of f4 are fine. With 2-4 minute exposures the sky gets very bright anyways. In total darkness however f2.8 and better is advisable. With the new generation of DSLRs with noiseless high iso capabilities you might just get good results using higher ISO settings. 8. Lens caps. Just make sure you have your lens caps with you. This is a small item but very much needed to create a "dark current" reference shot after all star trail shots have been taken. You might also want to make special flash lightened exposures of the foreground after finishing your trails. . 9. Spare batteries / CF-cards: make sure you have enough batteries and CF-cards with you to create the dark current reference shot after finishing the trail series. Usually even the very best batteries are flat after 50-60 exposures of 3-4 minutes. Make sure that you feel good out there in the night. So various stuff for your convenience: special underwear, hot tea, thermal-rest matrices, sleeping bag, possibly something to read ... you get the idea. Star trails are captured in hours and not in seconds. You decide about the compositional aspects of your shot and than you let the Earth rotate and do the rest. If you have two camera systems set up during a night you can create about 4-5 star trail shots depending on how long you let the system rotate, but you are basically very limited to only few shots every night. Compared to analogue capturing techniques the fundamental advantage is that you can do lots of experiments with various foreground exposures without messing up the one star trail shot that is clicking through the night and pre-visualisation is pretty easy with DSLRs.
Figure 5: Star trails with foreground (moonlight) and some clouds. The foreground was stacked to the composition refocusing to 50 cm.
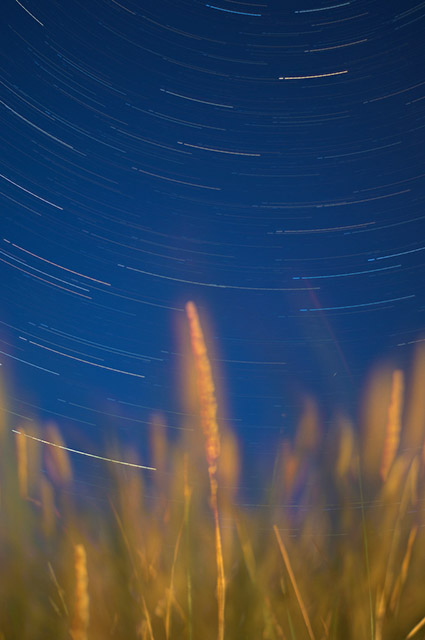
Figure 6: Here the foreground was refocused and stacked using the motion blurred version of the beach grass to create smooth transitions of the foreground objects (moonlight) into the defocused versions of the grass.
Figure 7: What can really mess up your concept are motion triggered lights. Make sure that these systems are switched off. Otherwise a stupid hedgehog defines how the lighting in your star trail image will look like (in this picture the light source on the left side behind the tree wasn't part of the idea, it was motion triggered in the backyard of the house). Btw.: this can be easily corrected using post processing techniques copying from a non affected exposure. ------ A full gallery with the most recent star trail shots from is online here: http://soeren.zenfolio.com/startrails mtk, SH |